Wave Accounting Tutorial - Introduction to Wave Accounting for YouTubers (2020)
Jan 14, 2020
Video
Wave App Accounting is a free accounting system that's simple and easy to use for YouTubers.
Cloud Accounting System
Wave App Accounting is a cloud accounting system, which means:
- there's no installation required
- free upgrades for you
- you can access Wave App Accounting with any device
- you can access Wave App Accounting any time
- you can access Wave App Accounting anywhere
Dashboard
Dashboard is the first page you'll see after you login to your Wave account.
There's a lot of data that you can see at a glance and plenty of shortcuts in this page.
Let's look at your dashboard in detail.
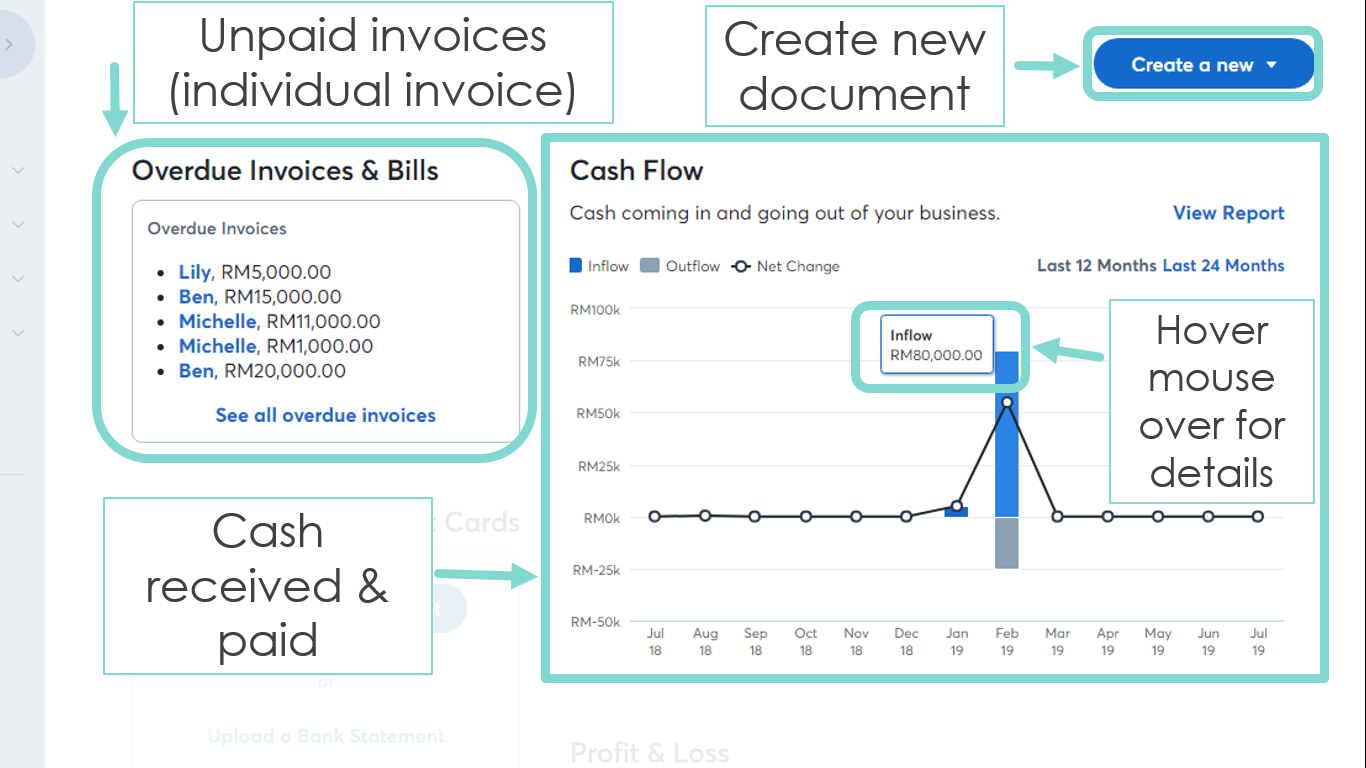
There's a Create a new button located at top right part of this page which is a shortcut for you. Click this button to if you want to create a new document such as a customer invoice or supplier bill.
The first section of your dashboard is Overdue invoices & bills. This section lists all your unpaid customer invoices and supplier bills.
Cash Flow, which is the cash received and paid by your company is the next section. Your monthly cash flow is presented in a bar chart and line chart format as it is easy to read at a glance. Hover your mouse over one of the bar to see the details.
The next section is Bank Accounts & Credit Cards, Monthly Profit & Loss and Things you can do.
Monthly Profit & Loss is a snapshot of your monthly business performance in bar chart format. Hover your mouse over one of the bar to see the details.
Things you can do is a list of shortcuts to frequently used transactions:
- Add a customer
- Add a vendor
- Customize your invoices
- Invite a guest collaborator

The next section is Payable & Owing. You can see how much your customers will be paying you and how much you should pay your suppliers based on the overdue days category. The overdue days categories are:
- 1-30 days overdue
- 31-60 days overdue
- 61-90 days overdue
- > 90 days overdue

The last section of your dashboard is Expenses Breakdown. All the expenses incurred by your business is now presented in a pie chart format. You can easily see which expenses your business has spent the most money on. Hover your mouse over to view the details.

Menu Bar
Menu Bar helps you to navigate around Wave Accounting and you can find the link to all pages here.
The menu bar of Wave App Accounting is situated on the left side of the page.

The first one on the menu bar is the one with Wave App Accounting logo and your company name. Click on this button and a pop up box will appear.
The first section of this pop up box is a list of businesses that you have access to. Create a new business link beneath this list lets you easily create a new business in Wave App Accounting.
Here you can Manage your profile and Sign Out of Wave App Accounting.

The second on the menu is a shortcut to return to Dashboard.
The next on the menu is Sales (to customers). Click on Sales to expand its menu.

Sales menu consists of all the transactions that you need to use to generate sales.
Estimates: View or create a new customer quote or also known as estimate in Wave App Accounting.
Invoices: Manage your customer invoice.
Recurring Invoices: Manage your repeating customer invoice.
Customer Statements: Generate customer statements.
Customers: Manage the list of your customers.
Products & Services: Manage the products & services that your company sells.

The next on the menu is Purchases (from your suppliers). Click on Purchases to expand its menu.

Purchases menu consists of all the transactions that you need to use to record your company's purchases.
Bills: Manage your suppliers' bills.
Receipts: Manage your receipts.
Vendors: Manage the list of your suppliers or also known as Vendors in Wave App Accounting.
Products & Services: Manage the products & services that your company buys.

The next on the menu is Accounting. Click on Accounting to expand its menu.
Transactions: Manage your transactions in Wave App Accounting.
Reconciliation: Shortcut to Bank Reconciliation page.
Chart of Accounts: Manage your Chart of Accounts.
Hire a Bookkeeper: Shortcut to Wave Plus Service, an additional service offer by Wave App Accounting.

The next on the menu is Banking. Click on Banking to expand its menu.
Bank Connections: Manage your Bank Connections with Wave App Accounting.
Payroll: Manage your payroll in Wave App Accounting.
Reports: Generate reports of your business.
Wave Plus: Shortcut to Wave Plus Service, an additional service offer by Wave App Accounting.
Integrations: Integrate with other systems (Example: Google Sheets, Etsy, PayPal and etc).
Settings: Settings for your business.

Customers (Sales)
The next few slides will be related to customers transactions (sales).
The first one on the menu is Estimates which is your customer quotes.
Access this page by clicking Sales > Estimates from your menu bar on the left.

All your customer quotes are listed here on the main listing page of Customer Estimates.
Click Create an estimate button on the top right of the page to create a new estimate for your customer.
You can filter your customer estimates by filling in the filter criteria.

Click on one of the estimate to view the estimate.
In this individual estimate page, there are a few buttons at the top of the page which is:
Edit: Edit this estimate
Convert to Invoice: Create an invoice from this estimate
Customer View: Have a look of your customer's view of this estimate
Send: Send this estimate to customer

The last button at the top of Estimate page is More button.
Click this button to see other options for this estimate such like Duplicate or export as PDF.

Your customer estimate details is presented in the middle of this page.

The next menu on your Sales section is Invoices.

All your customer invoices are listed here on the main listing page of Customer Invoices.
Click Create an invoice button on the top right of the page to create a new invoice for your customer.
A summary of your Total Overdue Invoices, Total Invoices which will Due within next 30 days and Average time to get paid is shown at the top of the page.

You can filter your customer invoices by filling in the filter criteria.
Your list of invoices are grouped by its status, which is Unpaid, Draft and All invoices.

Click on one of the invoice to view the invoice.
In this individual invoice page, the invoice number is shown on the top left of the page while Create another Invoice button is on top right of the page.

Click More Actions button to expand the menu for more invoice options such as Print or Preview as customer.

The first section of your invoice consists of your invoice details such as Invoice Status, Customer Name, Amount due and Invoice Due Date.
Click Edit invoice button to edit this invoice.
Click Send invoice button to send this invoice or Skip sending button.

Your invoice status is displayed here, such as Invoice creation date and date of your last sent invoice is displayed here too.

Scroll down the page and the invoice is displayed here.

The next menu on your Sales section is Recurring Invoices.

All your customer recurring invoices are listed here on the main listing page of Customer Recurring Invoices.
Click Create a recurring invoice button on the top right of the page to create a new recurring invoice for your customer.
You can filter your customer recurring invoices by filling in the filter criteria.
Your list of recurring invoices are grouped by its status, which is Active, Draft and All recurring invoices.

Click on one of the recurring invoice to view the recurring invoice.
In this individual recurring invoice page, Create another Recurring Invoice button is on top right of the page and More Actions button will expand the menu for more recurring invoice options.

The first section of your recurring invoice consists of your recurring invoice details such as Recurring Invoice Status, Customer Name, Invoice amount and Invoices created to date.
Click Edit Invoice button to edit this recurring invoice.
Click Edit Schedule button to edit the recurring schedule of this recurring invoice.
Click Edit payment button to change the settings of payment for this recurring invoice.

Click Edit Send button to edit the send settings for this recurring invoice.
Scroll down the page and the recurring invoice is displayed here.

The next menu on your Sales section is Customer Statements.

Fill in your report criteria and your customer statements report will be generated.
Click Preview the customer view button to have a look of what your customer see of this report.
Click Send button to send this report to your customer.

Scroll down this page to view your Customer Statement of Account.

Click Sales > Customers to access your Customers List.

All your customers are listed here on the main listing page of Customers.
There's 2 buttons at the top right of this page.
Click "Import from..." button to import a list of new customers.
Click Add a customer button to add a new customer manually within Wave App Accounting.


If you would like to edit an existing customer, click on the pencil icon.
In Edit a customer page, you will find your customer details here such as your Customer's contact and basic details, billing details, Shipping details, and additional fields such as notes and account number.


Click Sales > Products & Services to access your Products & Services (Sales) page.

Products & Services (Sales) page lists all of the products or services that you sell to your customers.
Click Add a product or service button on the top right of the page to create a new product or service that you want to sell to your customer.

If you would like to edit an existing product or service that you sell, click on the pencil icon.
In Edit a product or service page, you will find your product or service details here such as your product or service name, Description, selling price and Income account.

Suppliers (Purchases)
The second most frequently used transactions is suppliers transactions (Purchases).
The first one on the menu is Bills which is your supplier invoices.
Access this page by clicking Purchases > Bills from your menu bar on the left.

All your supplier invoices are listed here on the main listing page of Supplier Bills.
Click Create a bill button on the top right of the page to record a new bill from your supplier.
You can filter your supplier bills by filling in the filter criteria.

Click on one of the bill to view the bill.
The first part of this page is your bill details and these information are extracted from your supplier's invoice.
Fields marked with an asterisk (*) are compulsory.
The second part of this page is your payment details. Your payment to your supplier for this bill will be recorded here.
Click Save button to exit this page and save your changes or Cancel button to exit this page without saving your changes.

The second on the menu is Receipts.
Access this page by clicking Purchases > Receipts from your menu bar on the left.

All your receipts are listed here on the main listing page of Receipts.
Click Upload a receipt button on the top right of the page to record a new receipt.
You can filter your receipts by based on its status of All Statuses, Processing, Ready and Done.

Click on one of the receipt and your receipt details will pop up.
An image of the receipt is shown on the left while the information extracted from the receipt is shown on the right.
Click View original receipt link to view the original receipt image.
Click Close button to exit this pop up.

Click Purchases > Vendors to access your Suppliers List.

All your suppliers are listed here on the main listing page of Vendors.
There's 2 buttons at the top right of this page.
Click "Import from..." button to import a list of new suppliers.
Click Add a vendor button to add a new supplier manually within Wave App Accounting.

If you would like to edit an existing supplier, click on the pencil icon.
In Edit a vendor page, you will find your supplier details here such as your Supplier's contact and basic details and additional information.

Click Purchases > Products & Services to access your Products & Services (Purchases) page.

Products & Services (Purchases) page lists all of the products or services that you buy from your suppliers.
Click Add a product or service button on the top right of the page to create a new product or service that you want to buy from your supplier.

If you would like to edit an existing product or service that you buy, click on the pencil icon.
In Edit a product or service page, you will find your product or service details here such as your product or service name, Description, Expense account and Sales tax.

Accounting
The next few slides will be related to Accounting.
The first one on the menu is Transactions where you can find all other accounting transactions.
Access this page by clicking Accounting > Transactions from your menu bar on the left.

All your accounting transactions are listed here on the main transaction page.
There are a few buttons at the top of the page which is:
All Accounts dropdown box: Select an account here.
Add Income and Add Expense button: Create a new income transaction or expense transaction.
More button: Other options for this page such as Add journal transaction.


Banking
.


Reports
.


Sponsor

This video is sponsored by our online course, Master User Academy. Master User Academy helps non-accountants to do bookkeeping by using Cloud Accounting System like a Pro in simple English. Get real-time financial data of your business to grow your business faster. Join Master User Academy Level 1 now for FREE! ➡️ https://www.nutsaccounting.com/store
What is the next Wave App Accounting tutorial that you would like to learn?
Let me know in any of the social platforms or by email!
As always, Nuts Accounting is here to help Entrepreneurs to master Cloud Accounting System in simple English.
On this blog, there’s weekly tips & tutorials on Cloud Accounting System & online business curated just for you.
If you like this blog post, share it with your friends.
If you want to learn more on Wave Accounting tutorials, bookkeeping or tips on online business, click on the categories in the side bar.
I’ll see you in the next blog post!
Disclaimer: This blog post is not sponsored by any of the products mentioned in anyways at all. I created this blog post based on my personal experience and I hope that by sharing my knowledge with you, you can use yours better.
No part of the content of this video or any video published by Nuts Accounting, shall be stored, copied, recreated, republished, or transported.
If you click on the affiliate links and took action (sign up or purchase) I will earn a small commission to support this blog.
FREE COURSE
Start doing bookkeeping confidently with clarity and speed!
Get instant access to the entire course of Master User Academy level 1 for FREE!
We respect your privacy and we will only send emails on the topics of bookkeeping, Xero Accounting and business tips.

