Xero Training - How to do Bank Reconciliation for Online Entrepreneurs (2019)
Sep 10, 2019
Video
Sponsor

This video is sponsored by our online course, Master User Academy. Master User Academy helps non-accountants to do bookkeeping by using Cloud Accounting System like a Pro in simple English. Get real-time financial data of your business to grow your business faster. Join Master User Academy Level 1 now for FREE! ➡️ https://www.nutsaccounting.com/store
Bank reconciliation is one of the most important step in closing your monthly and annual accounts.
Today I’m going to show you how to do bank reconciliation in Xero Accounting.
Step 1: Preparation
The first step to successful bank reconciliation is preparation. Before you start, you need to prepare the following:
- Ensure all bank transactions are recorded in Xero
- Ensure your Bank Statement transactions is in Xero. There is 2 ways to do this:
- set up bank feed which automatically flows your bank transactions into Xero
- Manually import your bank transactions with CSV file
To know more information on setting up your bank feed, visit your local Xero website > Features & Tools > Bank feed. The list of banks of your country which supports bank feed function can be found here.

If you can't find your bank in the list, don't worry! You can still import your bank transactions with a CSV file. If you need help in preparing your CSV file and importing it into Xero, I have written a tutorial on this. Click here or the image below to jump to that tutorial.

Step 2: Xero Bank Reconciliation page
Login to your Xero account and click on Reconcile XX items button from your dashboard to go to Bank reconciliation page.

The Statement Balance and Balance in Xero is shown at the top of Bank Reconciliation page.
Statement Balance is the total balance of your bank statement transactions from bank feed or from manual import.
Balance in Xero is the total balance of all your Xero bank transactions which you have recorded.

The goal of bank reconciliation is to match Statement balance with Balance in Xero. If these 2 balances are the same, the status of your bank reconciliation is reconciled.
If these 2 balances are different, you will need to reconcile the transactions. Proceed with Step 3 to learn how to reconcile your bank in Xero.
Step 3: Reconcile existing transactions
It's time to work on your bank reconcilation!
There's 2 sets of transactions in your Bank Reconciliation page. The ones on the left are your bank statement transactions (from bank feed or manual import) while the ones on the right are unreconciled bank transactions which you have recorded in Xero.
If it is a match...
Xero will provide suggestion on transactions with the same amount and highlight the transactions in green. If it is a match, click OK button to reconcile the transaction.

If it is not a match...
If the suggestion by Xero is incorrect, you can change the matching by clicking on Find & Match.

The following details will appear beneath the bank transaction. Uncheck the box at section 2 to remove the pairing of the selected transaction.

You may now search for the correct transaction that you wish to pair. You can search by name, reference or amount in section 1. Once you found the transaction, check the box to select it. Your selected transaction will now appear in section 2.
Tips: You can select more than 1 transaction.
Once you have selected all of your desired transaction(s), section 3 will automatically calculate the total amount of your selected transactions and compare it against the amount in your bank transaction. Ensure that the amounts in section 3 is highlighted in green and then click Reconcile button to save your work.

Step 4: Record / modify Xero transactions
If Xero could not find a transaction with similar value, it will not suggest any transactions. You should then investigate further if this bank transaction is a new transaction (not recorded in Xero yet) or an existing Xero transaction but with different details (such as different amount).
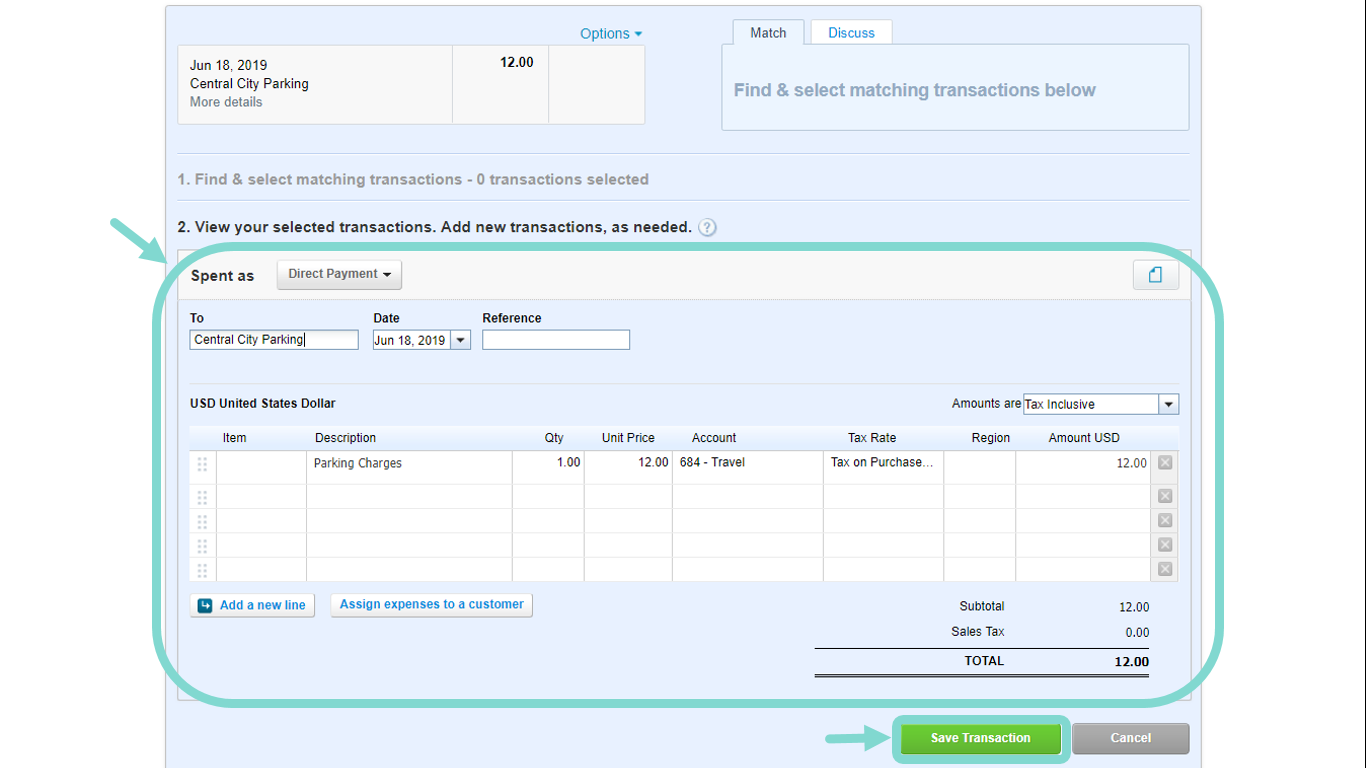
You can create new transactions directly from this page instead of going to its respective pages. Click Create tab and fill in the details below:
- Who: From whom did you receive the money or to whom did you pay the money to?
- What: choose the correct account
- Why: Additional description and details of the transaction
Click Add details to expand additional fields to fill in.

You may fill in additional details or split the transaction to different accounts at section 2. Once you have completed, click Save Transaction.
Step 5: Xero bank transactions balance = bank statement balance
Repeat step 3 and step 4 until all of the bank statement transactions are reconciled. Once you have finished, your page will look like this:

In the image above, the total amount of Balance in Xero is now changed to a green Reconciled status. The space which used to lists your bank statement transactions and bank transactions is now replaced with a message of "Great job! You've reconciled all the transactions for this account".
Congratulations! You have now reconciled your bank account!
Now we can print our bank reconciliation report in step 6.
Step 6: Print Bank Reconciliation Report
Click Reconciliation Report at the top right corner of this page to go to Bank Reconciliation Report page.
In Bank Reconciliation Report page, the first tab, Bank Reconciliation Summary will be selected by default.
Select your bank account name and Date and click Update button.
The report will now load and shown beneath the report criteria.
Click Publish button if you would like to publish this report for future retrieval in Xero.
Click Print button if you would like to print out this report.
Click Export button if you would like to export this report in Excel, PDF or Google Sheets format.
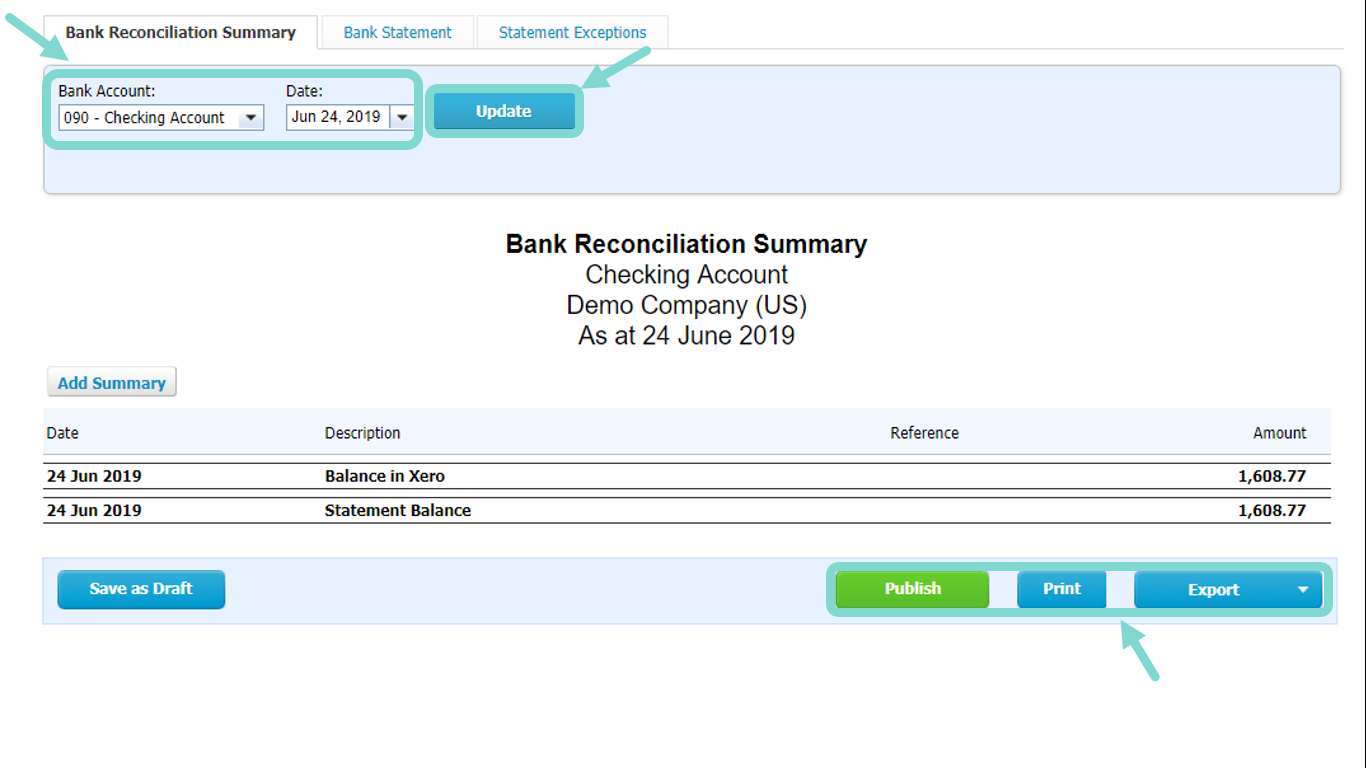
Once you save or print your Bank Reconciliation Report, you have completed your bank reconciliation! It's so easy to do bank reconciliation in Xero, right?
What is the next Xero Accounting tutorial that you would like to learn?
Let me know in any of the social platforms or by email!
As always, Nuts Accounting is here to help Entrepreneurs to master Cloud Accounting System in simple English.
On this blog, there’s weekly tips & tutorials on Cloud Accounting System & online business curated just for you.
If you like this blog post, share it with your friends.
If you want to learn more on Wave Accounting tutorials, bookkeeping or tips on online business, click on the categories in the side bar.
I’ll see you in the next blog post!
Disclaimer: This blog post is not sponsored by any of the products mentioned in anyways at all. I created this blog post based on my personal experience and I hope that by sharing my knowledge with you, you can use yours better.
No part of the content of this video or any video published by Nuts Accounting, shall be stored, copied, recreated, republished, or transported.
If you click on the affiliate links and took action (sign up or purchase) I will earn a small commission to support this blog.
FREE COURSE
Start doing bookkeeping confidently with clarity and speed!
Get instant access to the entire course of Master User Academy level 1 for FREE!
We respect your privacy and we will only send emails on the topics of bookkeeping, Xero Accounting and business tips.

